Showing posts with label Buttons. Show all posts

Sunday, December 18, 2011

Share a Card Sunday - I can't believe I didn't post this one

Happy Sunday, you guys!
Just my luck... Over the last week I was sick, right? well, I started to feel a bit better over the weekend but then - my daughter came down with something... total bummer.. the only upside to her illness was that fact that she wanted to cuddle all day in bed with me... poor baby.
Anyways, that whole story was just to tell you that I didn't make any new card over the weekend to show you.
Just as I starter to write an apology post about delaying the SCS (Share a Card Sunday) post - I found a picture of a card the I made a couple of months ago and haven't shared it yet.
Have a look:


I love this card for so many reasons:

  1. Awesome color combination - one of my favorites. Green and Pink always go together (in my humble opinion).
  2. No sentiment = no limits. It can be a "happy birthday" card or a "thinking of you card" or any other theme for that matter. Super usable.
  3. BUTTONS.. I love them. Those buttons are truly vintage buttons and by "vintage" I mean "old". I got them from my mom a few years ago and she had them for at least 10 years now. There absolutely awesome!
  4. Rounded corners.. If I could I would have round the corners of my desk, my computer screen, my windows at home.. everything square should have rounded corners. But that's just me :)
That's it for now. Thanks for visiting!
Come again soon,
IfatArt.

Sunday, December 11, 2011

Share a Card Sunday - Survival Kit

Happy Sunday!
It's almost the end of Sunday here is Israel but still Sunday so it counts...
I caught some kind of flu that goes around (my kid passed it on to me) but I still wanted to share with you the card that I made in the last week.
So, I'm sorry for this post being short, I just gotta go to sleep again (I feel awful).
I made a box filled with cards for various occasions around the year.
Just thought that it will be a great idea to give it to a man that keeps (like many of the men I know) forgetting birthdays, anniversaries, valentines and what not.
Have a look:


It turned out pretty cool...
Asked my hubby it (what does he think of the idea and if he would buy it) and he said that he would never dream of forgetting an event related to me so it's not necessary for him... haha... *pain in ribs* *pain everywhere*...
OK, before I'll have a complete shut down - I'm going to sleep.
Thanks for looking!
Come again soon,
Ifat.

Tuesday, October 11, 2011

Circle Flip Up Book

Hey everyone!
I'm back again with another creation to share with you all.
This time - it's maybe too big for my mini studio...
It's an 8" by 8" circle flip up book.
I got the instruction from splitcoaststampers (here) and it looked like something I just had to try.
I didn't noticed how time went by when I did it. When I finished it I realized that it took me 4 hours (!!!!) to make it.
So I don't know when I'll be doing this one again.
I'm not sure that I want to find myself awake at 1 am, thinking that my iphone must be showing the wrong time :)
Man... do I know how to complain... I had fun making it and that's that.

Here are the results:

So, what do you think? Was it worth my (long) while?

Thanks for visiting!
IfatArt.

Thursday, September 8, 2011

Bracelet? Made out of buttons?

Hi all!
The wind of changes..... could it be?
A while back I had an idea to start exploring the arts of jewelry making.
So I thought and I thought and finally, I decided to make a bracelet. Instead of buying charms, I decided to use my humongous collection of buttons.
So, here it is:


What do you say? pretty cool, right?
The funny thing is - I don't wear any jewelry.. so I'm not using it at all. Any takers?
In conclusion - I don't think I'll continue with a jewelry line at the moment... it's not my thing yet..

Thanks for stopping by!
IfatArt.

Wednesday, February 18, 2009

Random Card Wednesday #11

Can't believe I got so far...

OK. Let's get right down to business. I don't really celebrate Valentine's day with my husband (we love each other each and every day so we don't need a special day bla bla bla...).
But, and that's a big BUT.. All those awesome and sweet cards I see over the web these past few weeks got me. I just had to make some love cards.


So, as always, I turned to my scrapping idol for "advise" and I found this beautiful card over at Kristina's blog.
Since I have a huge collection of buttons in a veriety of colors, I decided that I wanted to make one too.
So I saw the video, listened to the instruction carefully and then I just made my own thing:
I used a chocolate brown cardstock for the card base and about 20 white or clear buttons.
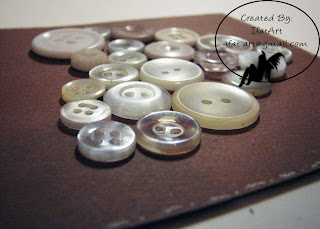
I addition, I used a white gel pen for the border that I doodled and for the "...love...love..." that I wrote there...

This card is super easy and fun to make. The hardest part of making it was picking out the buttons...

Here's a small close up on those buttons.


Supplies:
Cardstock - Chocolate Brown (no specific brand);
Accessories - about 20 buttons (white, clear and cream colored);
Tools - Paper trimmer/scorer (Provocraft), White gel pen.

Wednesday, October 1, 2008

OMG! Buttons!

Look at the unbelievable collection of buttons that my dear-sweet-mom gave me:

Isn’t she amazing? My recent crave is buttons and I told her about it. So she just went away and found some good old buttons for me.

And believe me - The amount of buttons you see in the pictures is just about half of what she gave me.
I love them - They look great & they save me money…lol…

I love my mom!

Saturday, August 23, 2008

A bit different…

I decided to do something different. You know, just to clear my head…
So, first I decided to use some of the canvases that I bought (don’t know what).
Now, what should I do? First I do something ugly… Keep reading, you’ll see what I mean.
I have some acrylic paints so I sat down and started painting the first canvas… I wanted to paint a transition from red at the bottom to yellow at the top. After painting for about 15 minutes I remember that I had no idea how to do that so I just tried whatever I thought that would help to do the transition.
Then, I decided to use some buttons to cover some parts of the border between the red and the yellow. So I sawed those on…. After that I glued a big flower and a butterfly, added a “Butterfly” title and did some doodling…
“There you go, I’m done” I thought… Well, my advice – When you try something new (and you’re not sure you know what you’re doing), take a step back (literally) every few minutes and make sure that you’re work doesn’t become a huge pile of confusion…

I don’t like it… at all. My husband, on the other hand, think that it look great and that we should hang it in the living room… You get that his idea wasn’t accepted, right? I think he just wanted to be nice, but I think it’s ugly… Wanna know what I did with it? I hanged it in my creations room to remind me not to do this mistake again… I’m thinking about making a sign for it that says: “Always take a step back. Always!”… lol…
That was a few weeks ago. Last week I decided to try again. This time I thought it through. I found this tutorial: http://nicholeheady.typepad.com/capture_the_moment/2008/01/5.html.
And I decided to use that idea for a card on my canvas. I think that what I did is called “lifting” (when you see someone do something and that make your own version of it).
That’s the result:
Now that’s more like it. Now I’m happy and I can sleep safe and sound. I’m not a complete disaster when it comes to canvases…

And now, I went ahead and put it in my etsy shop. Have a look & spread the word!

Thanks for looking & reading!

 
Clicky Web Analytics
