
Which one is it? Either way - I made a couple.
A while back, when I started my small business (and thought I should put my creations on sale), I made a couple of forever calendars.
Here's the first one:
.jpg) | .jpg) |
 .jpg) |
.jpg) I used the Bind-it-All 6 inch by 6 inch covers and the light blue O rings.
I used the Bind-it-All 6 inch by 6 inch covers and the light blue O rings.For the inside pages, I used glossy paper and I printed out the designed pages that I made for each month.
Here's the other calendar that I made:
.jpg) | .jpg) |
 .jpg) |
Here I used the same inside pages and covers. I only changed a couple of things - the DP (that I used for altering the covers) and the O rings (this time I used the baby pink ones that I have).
Oh, yeah... and I rounded up the corners in this one (almost forgot about that...).
It was really easy to make them, once I printed out the inside pages. The Bind-it-All makes it so easy to create those little books (or in this case - little calendars).
Thanks for joining me today!
.jpg) I used Ronit's Cricut to cut out those vanilla letters. I cut them out at about 3 inches high.
I used Ronit's Cricut to cut out those vanilla letters. I cut them out at about 3 inches high.
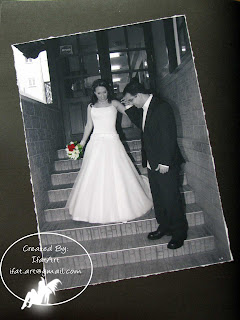 This is the first one. As you can see, it's a super simple hibrid page. The only thing I've done is turn the whole picture into Black&White and left my rose in vivid colors.
 The seconde page is actully a transparency paper with the same photo printed on it. I made sure that the photo on the transparency paprt wouldn't align perfectly according to the first page that you saw earlier. That way the image gets that "ghostly" look to it, don't you think? with all the doubling of th shodows and stuff? I have to say that the picture is a bit dark due to bad lighting that day so the page looks a bit gloomy but it's actually not that dark.. I'll try to post a better picture as soon as I'll manage to take one.
 When you turn the page you can still see the photo and it even has the texture of the page bafore it. Well, I love it.
  It's another hibrid page... I turned the background to sepia and left our figures in vivid color.
 It's another hybrid page (digitally enhanced photo on a handmade page).


