Wednesday, February 25, 2009

Random Card Wednesday #12

Happy Wednesday everyone!

Today I have a RCW bonanza!

Over at the 2peas site there's an education section in which there are great classes in all sorts of topics related to scrapbooking and card making.

I decided to take Kristina's (yes, my idol) class: A Year in Cards.
Each month Kristina issues out a PDF file with skecthes and instruction along with a video tutorial. She teaches all sorts of technics and shows tools - super fun!

So, today, I'll show you the "homework" that I made for January's class (yes, I know... a bit late, but hey - I just got to know the class).
I made three cards for January. I just made one card for each scetch that we got (I'm not sure if I'm allowed to show the sketches so I won't. But you can hop over to 2peas and see for yourself).

The first card:
It's a 4 inch by 5 inch card made from vanilla cardstock.
I used a deep purple cardstock that I embossed with my birds and swirls embossing folder (from Cuttlebug). In addition, I used some ruby red circles (that I cut with my cuttlebug - I just love that machine!) as the base for the pink prima flowers.
Simple. Clean. Just the way I like it.

The second card:It's, again, a 4 inces by 5 inches card. I tried to keep the colors pretty much the same (except for that light green base). That gorgeous flower is a flower that Tamar got for me (thanks dear!).

And, last but certainly not least (It's my most favourite card out of those three), this is the third card:

It's a 3 inch by 3 inch card (I love that size!). I used my glitter gel pens to doodle at the edge and write over the stamped sentiment.

That's all for today, Have a great day guys!
Thanks for joining me today!

Tuesday, February 24, 2009

Another long forgotten "Table For Five" project

Remember "Table for Five"? The blog that me and my friends started a while back?


Well, we started the alphabet challenge and we're at the fifth letter of the Hebrew Alphabet, which is "ה" (or Hey). The word that we picked was "Hadarim" which means "citrus".


The purpose was to create anything that had something to do with citrus. It can be the colors, it can be the shape, it can be anything.


So, I decided to make a sweet sweet friend of mine a recipe book of citrus desserts. I collected about 20 recipes and wrote them down (by HAND!!!) on a circle shaped paper that I designed digitally and printed.

The covers of the recipe book were made to look as much as an orange so I cut out the slices of the "orange" and organized them in the middle of the circle shaped cover.


This is the card that I added to the gift:

As you can see, it also has that citrus feel to it... with the colors and all.
I didn't add any sentiment on the card because... first of all it's a "just because..." card (which means I don't really have a reason for giving it away.. The person is just a good friend of mine, that's it). Secondly, I don't have any sentiment stamp that fits the "occasion"... oh... the small detail...

Thanks for joining me today!

Monday, February 23, 2009

"Before the Wedding" Digital Album - Part 2

So, after sharing the first part of my "before the wedding" digital album - today I'll show you the second part:

I used the same digital kits that I used on the first part of the album from the shabby princess (there's a link in the sidebar).

That last picutre is soo funny. A kid drove buy with his motorcycle and the photographer asked him to loan us the motorcycle for the picture... Though the motorcycle just stood there I was still too scared to get on it.

I had so much fun that day, I can't get enough of those sweet sweet memories... Umm... Should I be worried that I have such great memories and pictures only from before the wedding? hehe...
OK, OK. I have great memories from after the wedding. Not a lot of pictures. But I do have great memories... I think.

Thanks for joining me today!

Sunday, February 22, 2009

I can't believe I didn't share this with you...

I went through my creations folder and I came across a mini (or short) digital album that I made out of our "before the wedding" picutres.

I checked and it seems that I didn't show you the album, and I just can't believe it.

Anyways, sorry about that, here's the album:


Well, that's the first part of the album. I quite like it.

I used a bunch of digital kits that I found over the web (the ones I used in this album is from the shabby princess). If you like digital scrapbooking that's the site to visit. I just love their style! and I already added them to my favorites in my sidebar.

These pictures were taken about a week before the wedding (which means almost two years ago... phew... I can't believe it's been two years already...). We had a lot of fun that day. The photographer was so funny. We both were so nervous about everything but he cracked us up so we had fun and the picutres show it.. I think...

Thank you for joining me again today!
Have a great week!

Wednesday, February 18, 2009

HPT Suspended...

Hi all!
I sat down today, as usual, to write my post for tommorow's HPT and I came to a decision: I really don't enjoy sharing handmade layouts anymore.
I'm not really sure why. I quite like what I did so far but I just don't enjoy sharing it..
Maybe it's related to the fact that I tried to set up a small business of my own for albums' designs and it didn't work or I don't know.
All I know is that I don't enjoy as much as I did before so I decided to suspend the HPT for now.

I'm planing a lot of changes around here.. I won't tell you about them but let me tell you - I'm sure you'll love the changes. It will be interesting.

Thank you for reading me so far, I hope you understand.
Have a great day!

Random Card Wednesday #11

Can't believe I got so far...

OK. Let's get right down to business. I don't really celebrate Valentine's day with my husband (we love each other each and every day so we don't need a special day bla bla bla...).
But, and that's a big BUT.. All those awesome and sweet cards I see over the web these past few weeks got me. I just had to make some love cards.


So, as always, I turned to my scrapping idol for "advise" and I found this beautiful card over at Kristina's blog.
Since I have a huge collection of buttons in a veriety of colors, I decided that I wanted to make one too.
So I saw the video, listened to the instruction carefully and then I just made my own thing:
I used a chocolate brown cardstock for the card base and about 20 white or clear buttons.
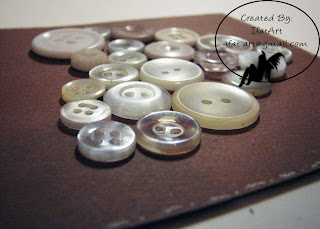
I addition, I used a white gel pen for the border that I doodled and for the "...love...love..." that I wrote there...

This card is super easy and fun to make. The hardest part of making it was picking out the buttons...

Here's a small close up on those buttons.


Supplies:
Cardstock - Chocolate Brown (no specific brand);
Accessories - about 20 buttons (white, clear and cream colored);
Tools - Paper trimmer/scorer (Provocraft), White gel pen.

Thursday, February 12, 2009

Handmade Page Thursday #10

Hi again!
Like I promised, today I'll continue showing my sample album.

This is the first page in Ron & Ronit's section of the sample album. I decided that each couple will get about 20 layout and that way the album will hold 3 different couples.

Anyways, Here today's page:
I used Ronit's Cricut to cut out those vanilla letters. I cut them out at about 3 inches high.
In addition, I used a silver gel pen to ouline the big photo (and added a little doodle at the top).
As you can see, the photos are very similar, that's why I made only one of them in color. Just to give it an different focal point, more or less...

That's it for today, I hope you enjoyed it.

Wednesday, February 11, 2009

Random Card Wednesday #10

Happy Wednesday everyone!


Thank you for joining me again to the RCW #10 I have here on my blog.


Today, I'll show you another Bella card that I made (I told you that you'll be seeing a lot of them from now on):
For the card base, I used a very light polka dot yellow paper that I didn't know what to do with it. So I made a card with it.

I used a scrap of patterned orange cardstock that I had left from a project I'm working on right now (can't show it to you yet...). I sanded off the edges of it to expose the white core a bit.. I love that effect.
I stamped the Bella with Black Stazon ink and colored it with my Sharpies...

And, of course, as you can see, I used some foam adhesive tape for the stamped image... I just had to pop that Bella up.

Well, that's all for now. Thanks for looking!

Thursday, February 5, 2009

Handmade Page Thursday #9

Hello again everyone,

Like I promised, I have a new wedding album pages (or layouts) to share with you.
The album that I'll start with today is my sample album that will contain lots of layout designs with some other wedding pictures...
So, here's the first page that I made:

This page is used as the "header" of the whole album.
I used one of Ron & Ronit's wedding pictures of their shadows that I just loved.
For the letters I used some vanilla cardstock that I cut with Ronit's Cricut (awesome machine - I can stare at it for hours while it's working).
On top of the letters I added some light green gems to add some sparkle to the page.

Well, I quite liked the result. What do you say?

Wednesday, February 4, 2009

Random Card Wednesday #9

Hello again,

I finally had some time this last weekend to create some cards so I have a brand new card to show you all:
This is a card that I made at Ronit's house on our last "get together" before all her exams kick in...

I used some craft cardstock for the base of the card and used some of Ronit's doodling stmaps on it. On top of that I added my new Bella stamp (yes, yes, I gave in and bought a few... so don't be surprised to see a lot of them from now on). I stamped my Bella on a vanilla cardstock and I used a bright pink for matting it. I'll have the whole recipe at the end of the post.

I just had to use some plain dimensionals to pop the Bella off the craft cardstock.

Now, I took the last picture just to show you the coloring that I've made (I had fun doing that!):


Card Recipe:
Cardstock colors: Craft, Bright Pink, Vanilla (no fancy brand name. just from the typical craft store here).
Stamps: Ballonabella (StampingBella); Dot Flourishes (Inkadinkado - Clear Stamps Set).
Inks: Green Galore, Real Red(All Stampin' Up!); Black (Stazon).
Accessories: Scallop border punch (Fiskars), Blender pen, Dimensionals.

Thanks for looking!
Have a great day!

 
Clicky Web Analytics